I just can’t think about February without thinking about chocolate. Hmmm… I wonder why? Is it because Valentine’s Day is sitting right there in the middle of the month threatening to derail all of our good diet intentions with its bounty of fancy truffles, chocolate dipped strawberries and other fabulous, chocolate-laden gluten free (and many not so gluten free) treats? It must be a plot of some sort. After all, we start the year with our resolutions – to lose weight, eat healthier, cut sugar out of our diets, eat less fat, exercise more…the list goes on. So we eagerly get started with great resolve, it is new and we are determined. And most of us, while we face challenges, start to feel better by the end of the January. This keeps us going a little longer. And then right there, smack dab in the middle of February, is a day that basically revolves around chocolate and sugar with some hearts thrown in. If we just ate a nice chocolate or treat on the day, that would be no problem, but we don’t. We eat half a box (at least) of chocolates because, well, it’s a gift after all and we don’t want to be rude do we? And then maybe we celebrate the day with a special, calorie and fat laden meal that ends with, yep!… more chocolate. And if we don’t have someone special in our lives to give us chocolates and take us out to dinner, we may fill the void with pints of ice cream topped with fudge sauce or whatever the sugar-filled, fat laden food of our choice is. If we just stepped off the path of healthier eating for the one day, it wouldn’t be that big of a deal – the problem is that once we meander off the path, sometimes it seems much more interesting to continue in that direction and it can be a very difficult time getting back on it. Am I saying don’t have chocolate on Valentine’s Day. NO! After all that, would be paramount to heresy. What I am saying is eat one of those lovely truffles and hide the rest in your freezer. Have those chocolate dipped strawberries or ice cream with fudge sauce but do it in a more health-minded manner. In other words indulge guilt free. This is a guilt free fudge sauce that feels and tastes indulgent but is actually refined sugar free and practically fat free! It takes under 10 minutes to prepare and lasts about 10 days in the fridge. This sauce gets its rich flavor and luxurious texture thanks to a combo of unsweetened cocoa powder, coconut sugar, a touch of instant espresso powder (not essential but it really deepens the chocolate flavor), pure vanilla extract and dark, almost caramelly organic raw blue agave from Wholesome Sweeteners. Dip strawberries (or any fruit really) into it, spoon it on top of ice cream (for a really guilt free dessert try making a sundae with my almost instant cherry frozen yogurt) or just lick it off a spoon. You will feel all the fudgy chocolate love without bouncing off the walls or derailing all your good dietary progress. Gluten Free Guilt Free Fudge Sauce Ingredients 1 cup water ½ cup coconut sugar ½ cup organic raw blue agave (dark agave) ¾ cup unsweetened cocoa powder 1 tablespoon instant espresso powder (optional) 1 tablespoon pure vanilla extract Directions Combine the water, coconut sugar, agave, cocoa powder and espresso powder (if using) in a heavy sauce pan and bring to a boil over medium heat stirring until smooth. Boil for 5 minutes or until it starts to thicken. Whisk in the vanilla and let cool for about an hour – the sauce will thicken more as it cools. Store in a covered container in the fridge for up to 10 days. Serve warm or cold. The sauce can be re-heated for a hot fudge sauce by microwaving for a minute or so on high power. A gluten free, refined sugar free recipe that makes about 1½ cups of sauce. Ready for more dessert? Simply…Gluten-Free Desserts is now available, with over 135 recipes not featured in my blog. Available at bookstores including Barnes & Noble, Borders, Powells, Books-a-Million and Amazon. Resource :
You may think it is strange for me to be posting a tomato recipe in the dead of winter but before you purists who only eat tomatoes at their peak of ripeness and perfection (late summer) get all up in arms, let me explain. I guess I need to start with a confession, so here goes. “Hi, my name is Carol and I am a tomato addict. And that’s not all; I have passed my addiction along to everyone in my family.” Seriously, we could be out of milk, eggs and gluten free bread and I am still not hopping in the car to run to the store, but just let us run out of tomatoes and I am off to the market before you can blink. A good portion of my grocery budget goes to tomatoes every week! We have even tried to support our habit by growing our own tomatoes – no luck yet but we are still trying. So as you can see, I am not going to let a little thing like “out of season” get in my way of eating tomatoes. While tomatoes may be available all year round, they do tend to be pretty flavorless when not in season. The solution? Roasting them! Roasting is a great way to bring out the natural sweetness of any vegetable and it works great with tomatoes. But for this recipe I took it one step further – in essence I scalloped them. With a bit of balsamic vinegar, garlic and rosemary, the tomatoes become a fabulous winter side dish or vegan main course. In the summer, fresh basil would be a great substitution of the rosemary. All the lovely, flavorful, aromatic juices exuded by roasting the tomatoes are soaked up with Kinnikinnick’s Gluten Free Panko Style Bread Crumbs which also provides a nice crunchy topping. If you have any leftover scalloped tomatoes, serving with them with a poached egg on top is pure bliss. In fact, next time I make this recipe I am not counting on leftovers – I am making it specifically for topping with an egg because, yep, it really is that good! Do you have a food addiction? Gluten Free Scalloped Tomatoes Ingredients 2 pound plum tomatoes 1 tablespoon fresh rosemary, minced 2 tablespoons balsamic vinegar 2 tablespoons olive oil 5 garlic cloves, minced or grated 2 teaspoons kosher or fine sea salt 1 teaspoon freshly ground black pepper 1 ½ cups Kinnikinnick gluten free panko style bread crumbs – use divided Directions Preheat oven to 350 degrees. Cut the tomatoes into roughly 1 inch pieces. Place in a 8 inch by 8 inch (or similar sized) baking dish. Add the rosemary, balsamic vinegar, olive oil, minced garlic cloves, salt, pepper and 1 cup of the bread crumbs, toss well. Sprinkle the remaining bread crumbs on top and bake for 25 minutes. Top with the remaining ½ cup of bread crumbs and cook for 10 more minutes or until the top is nicely browned. A gluten free recipe that serves 6 people. Ready for dessert? Simply…Gluten-Free Desserts is now available, with over 135 recipes not featured in my blog. Available at bookstores including Barnes & Noble, Borders, Powells, Books-a-Million and Amazon. You can get it also HERE. Resource : http://simplygluten-free.com/blog/2012/01/gluten-free-scalloped-tomatoes-recipe.html
You may think it is strange for me to be posting a tomato recipe in the dead of winter but before you purists who only eat tomatoes at their peak of ripeness and perfection (late summer) get all up in arms, let me explain. I guess I need to start with a confession, so here goes. “Hi, my name is Carol and I am a tomato addict. And that’s not all; I have passed my addiction along to everyone in my family.” Seriously, we could be out of milk, eggs and gluten free bread and I am still not hopping in the car to run to the store, but just let us run out of tomatoes and I am off to the market before you can blink. A good portion of my grocery budget goes to tomatoes every week! We have even tried to support our habit by growing our own tomatoes – no luck yet but we are still trying. So as you can see, I am not going to let a little thing like “out of season” get in my way of eating tomatoes. While tomatoes may be available all year round, they do tend to be pretty flavorless when not in season. The solution? Roasting them! Roasting is a great way to bring out the natural sweetness of any vegetable and it works great with tomatoes. But for this recipe I took it one step further – in essence I scalloped them. With a bit of balsamic vinegar, garlic and rosemary, the tomatoes become a fabulous winter side dish or vegan main course. In the summer, fresh basil would be a great substitution of the rosemary. All the lovely, flavorful, aromatic juices exuded by roasting the tomatoes are soaked up with Kinnikinnick’s Gluten Free Panko Style Bread Crumbs which also provides a nice crunchy topping. If you have any leftover scalloped tomatoes, serving with them with a poached egg on top is pure bliss. In fact, next time I make this recipe I am not counting on leftovers – I am making it specifically for topping with an egg because, yep, it really is that good! Do you have a food addiction? Gluten Free Scalloped TomatoesIngredients2 pound plum tomatoes 1 tablespoon fresh rosemary, minced 2 tablespoons balsamic vinegar 2 tablespoons olive oil 5 garlic cloves, minced or grated 2 teaspoons kosher or fine sea salt 1 teaspoon freshly ground black pepper 1 ½ cups Kinnikinnick gluten free panko style bread crumbs – use divided Directions Preheat oven to 350 degrees. Cut the tomatoes into roughly 1 inch pieces. Place in a 8 inch by 8 inch (or similar sized) baking dish. Add the rosemary, balsamic vinegar, olive oil, minced garlic cloves, salt, pepper and 1 cup of the bread crumbs, toss well. Sprinkle the remaining bread crumbs on top and bake for 25 minutes. Top with the remaining ½ cup of bread crumbs and cook for 10 more minutes or until the top is nicely browned.
Leaving cookies and milk for Santa is something we always do in this house. Call it appreciation for the gifts he will bestow, offering some Gluten Free sustenance for a long night or maybe even just a little extra assurance that Santa will know we have been nice this year, not naughty. Every year it is something different. This year we are leaving Gluten Free Santa’s Thumbprint Cookies. We thought maybe he would feel a twinge of recognition and know how grateful we are. For maraschino cherries without red dye or corn syrup, try these. If you put out cookies for Santa, what kind do you leave? Gluten Free Santa’s Thumbprint Cookies Ingredients 4 cups pastry quality gluten-free flour 1 tablespoon baking powder ¾ teaspoon salt 1 cup unsalted butter, at room temperature ¾ cup granulated sugar ¾ cup corn syrup or light agave nectar 1 large egg 2 teaspoons pure vanilla extract ½ cup sanding sugar (or just more granulated sugar) One 11 ounce bag semisweet chocolate chips 24 maraschino cherries, cut in half and dried well Directions Whisk together the flour, baking powder and salt and set aside. Cream together the butter and ¾ cup sugar with an electric mixer. Add the corn syrup, egg and vanilla and mix well. Gradually add the flour mixture, with the mixer on low, and beat until combined. With a spatula, scrap the sides and bottom of the bowl to make sure everything is mixed well. Roll the dough into 1 inch balls then roll in the sanding sugar and place on a plate or baking sheet – you can put them on top of each other – and refrigerate for 30 minutes. You can make ahead of time but if they are refrigerated for more than 30 minutes you will have to let them sit out for a few minutes before proceeding. Preheat oven to 350 degrees. Line 2 cookie sheets with parchment paper or silicon baking mats. Place the balls on the prepared cookie sheets about an inch apart. Flatten with your thumb, making an indentation in each ball. Bake for 10 – 12 minutes or until firm but not beginning to brown. Leave oven on. If the indentations have risen, use the end of a wooden spoon to depress again. Fill each indentation with a teaspoon of chocolate chips. Return to oven for 2 minutes. Using a small offset spatula or spoon, swirl the chocolate chips to melt. Top each cookie with a maraschino cherry half. Want to know more about your favorite Gluten Free Recipe or how to avoid being bothered by Celiac with our range of Gluten Free Recipes which are made from Gluten Free raw material feel free to visit us at: http://www.simplygluten-free.com Article Source: http://simplygluten-free.com/blog/2011/12/gluten-free-santas-thumbprint-cookies-recipe.html
Once upon a time a caprese salad, bursting with fresh tomatoes, basil and mozzarella met up with a gluten free pasta salad. They fell instantly in love. The resulting love child of this auspicious union was the gluten free caprese pasta salad. A love story if ever I heard one. Gluten Free Caprese Salad Ingredients 1 – 16 ounce package gluten free rice pasta (shells, elbows or spirals) 1 ½ cup loosely packed fresh bail leaves, use divided 1 clove garlic, minced Zest and juice of 1 lemon ½ teaspoon kosher or fine sea salt ½ teaspoon freshly ground black pepper 1/3 cup olive oil (maybe a tad more) 1 pint cherry or grape tomatoes, halved 6 ounces bocconcini (small mozzarella balls), quartered Directions Cook the pasta in heavily salted water 1 or 2 minutes less than the package instructions until just al dente. Drain well and put the pasta into a large serving bowl. While the pasta is cooking combine 1 cup of the basil with the garlic, finely grated lemon zest, lemon juice, salt and pepper in a blender and blend until the basil is finely minced and the mixture is combined. Take the plastic top insert from the top of the blender out and slowly stream in the olive oil with the machine running. You want a thick dressing but not as thick as mayonnaise. If the mixture is too thick, add more olive oil. Once the pasta is cooked and drained pour the dressing over the warm pasta. Toss well and let cool. Roll the remaining basil leaves up like a cigar and cut into thin slices with a sharp knife. When the pasta has cooled, add the basil, tomatoes and bocconcini. Cover and refrigerate for at least half an hour or up to two days. Taste and adjust seasoning with more salt and pepper if needed. This gluten free recipe serves 6 – 8 people. Article Source: http://simplygluten-free.com/blog/2011/09/gluten-free-caprese-salad-recipe.html
As we come to the end of summer we also come to the end of the sweet cherry season. Just when I was starting to take for granted lush, ripe, juicy cherries I realized it was time to start REALLY appreciating them and using them in as many gluten free recipes as I can before they were gone for this year. So along with blending some into smoothies and baking them into muffins and pies I decided to venture out into other parts of the menu – the appetizer for example. What’s that you say? Cherry appetizers? Seriously? Yep, seriously! Baked with creamy brie and another summer favorite, basil, cherries make for a sophisticated yet seriously simple starter. But don’t take my word for it, throw together this recipe and see for yourself. But hurry! Cherry season is almost over. Oh and if you don’t already have one, this would be a good time to invest 5 or 10 dollars in a cherry pitter. This one, you can take my word for – they work great! Baked Cherry and Brie Appetizer
Ingredients2 pounds sweet cherries, pitted ½ teaspoon kosher or sea salt Large pinch black pepper ¼ cup loosely packed fresh basil leaves, chopped 1 – 7 ounce round of brie 8 slices gluten-free bread 4 sprigs of fresh basil for garnish DirectionsCombine the cherries, salt, pepper and chopped basil in a mixing bowl. Cover and refrigerate for at least 2 hours and up to a day ahead. Preheat oven to 350 degrees. Place on rack in the top third of the oven and the other rack in the bottom third. Slice the crusts off the gluten free bread and cut each slice in half diagonally to make triangles. Lay on a baking sheet. Divide the cherries along with any accumulated juices into 4 ramekins. Cut the rind off the round of brie and cut into quarters. Place the brie quarter on top of the cherries. Place the ramekins on a baking sheet. Put the bread on the top shelf of the oven and the cherries on the bottom. Bake for 10 – 12 minutes or until the bread is toasted and the cheese is melted. Garnish each ramekin with a sprig of fresh basil and 4 toast triangles and serve immediately. A gluten free recipe that serves 4 people (or 1 really greedy cherry lover like me!). Want to know more about your favorite Gluten Free Recipe or how to avoid being bothered by Celiac with our range of Gluten Free Recipes which are made from Gluten Free raw material feel free to visit us at: http://www.simplygluten-free.com Article Source: http://simplygluten-free.com/blog/2011/08/gluten-free-baked-cherry-and-brie-appetizer-recipe.html
We all know San-J as the people who bring us gluten free, wheat free soy sauces! But did you know they now also produce GLUTEN FREE GRILLING SAUCES? That’s right, the people who made it not only possible but easy for us gluten intolerant folks to enjoy sushi, have now made it just as easy to enjoy grilling and barbequing. And you don’t have to do a lot of hunting to find these grilling sauces, they are right there on your regular grocery store shelves. It was my pleasure to develop gluten free recipes for San-J as a part of their overall effort to provide convenient and delicious solutions for those on a gluten-free diet. It was an equally momentous pleasure to become, if only for a couple of weeks, the grill-master of our household! In our family, my husband is the self-proclaimed grill-master and while the food he “cooks over fire” is always sumptuous, it lacks a certain…hmmm…., let’s say…refinement. Don’t get me wrong, I love big hunks of cooked meat thrown on a platter just as much as the next person - it makes for a terrific backyard barbeque with paper plates and all but is missing the aesthetic quality I would want for say, a dinner party. This swordfish recipe is beautiful and elegant and yet so easy to prepare. I used San-J Orange Sauce as both the marinade for the swordfish and in the dressing for the lovely, bright salad. Who is the grill-master in your family? Swordfish with Orange Fennel Salad
Ingredients4 – 6 ounce swordfish fillets ¼ cup plus 2 tablespoons San-J Orange Sauce, use divided 2 large oranges, peeled 1 large fennel ¼ cup olive oil 1 teaspoon kosher or fine sea salt ½ teaspoon black pepper DirectionsPlace the swordfish fillets in a large plastic storage bag. Add ¼ cup San-J Orange Sauce and gently shake to coat the fillets with sauce. Marinate in the refrigerator for 30 minutes. Heat grill to medium-high heat (450 degrees). Cut the oranges into segments over a plate or bowl to catch the juice. Measure 1 tablespoon of orange juice and combine with 2 tablespoons San-J Orange Sauce, olive oil, salt and pepper in a medium mixing bowl. Add the sliced fennel and toss gently to combine. Cover and refrigerate until serving time. Remove swordfish from marinade and discard marinade. Brush grates of the grill with some oil. Grill for 8 minutes with the lid closed, turning once. Place the orange and fennel salad on plates and top with the swordfish fillets and serve. A gluten free recipe that serves 4 people. Want to know more about your favorite Gluten Free Recipe or how to avoid being bothered by Celiac with our range of Gluten Free Recipes which are made from Gluten Free raw material feel free to visit us at: http://www.simplygluten-free.com Article Source : http://simplygluten-free.com/blog/2011/08/gluten-free-grilled-swordfish-with-orange-fennel-salad-recipe.html
I have a confession to make – I have been just plain lazy lately. Honestly, there have been no miles logged on the treadmill, projects I started lay there half done and my oven has seen very little use. I blame the heat. It is seriously hot out there! And it is not, as my friends who live in the desert can say, a dry heat. Oh no, it is a sticky, yucky, energy-zapping, wet, humid heat. We are talking 96 degrees and 96 percent humidity. I swear little slits have starting opening up on my neck and gills are forming. No matter how hot it is outside, apparently we still need to eat. This is a lovely, Greek inspired, gluten-free recipe for a cold soup that is perfect for summer. You don’t have to turn on the stove, it requires you expend very little energy and it will help keep you in bathing suit shape with no fat and only about 100 calories in a bowl if you use fat free Greek Yogurt. If making it dairy free and using either soy or coconut yogurt the fat and calories will be higher. I love this Cold Cucumber Soup for lunch, with a hearty salad for dinner or as a starter for barbeque. Do you have any go-to, beat the heat, gluten-free recipes? Cold Cucumber Soup
Ingredients3 English or European Cucumbers (also called seedless cucumbers), peeled and chopped 2 cloves garlic, minced 2 green onions, chopped ¼ cup fresh mint leaves Juice of 1 lemon ½ cup water ½ cup fat-free Greek yogurt (for vegan or dairy free use dairy free yogurt) 1 teaspoon kosher or fine sea salt ½ teaspoon black pepper DirectionsPlace the cucumbers, garlic, green onions and mint leaves in a blender or food processor and process until smooth. Add the lemon juice, water, yogurt, salt and pepper and process to combine. Chill in the refrigerator for about 3 hours or until cold. To serve right away, pour the soup into a large mixing bowl and set that bowl into a larger bowl filled with ice and water. Stir occasionally until chilled, about 10 minutes. A gluten free recipe that serves 4 people. Want to know more about your favorite Gluten Free Recipe or how to avoid being bothered by Celiac with our range of Gluten Free Recipes which are made from Gluten Free raw material feel free to visit us at: http://www.simplygluten-free.com Article Source : http://simplygluten-free.com/blog/2011/08/gluten-free-cold-cucumber-soup-recipe.html
I was a skinny kid. Actually it is not uncommon for people with gluten issues, who should be gluten free, to be skinny, especially those with Celiac Disease. We have issues with digestion and do not properly obtain nutrients from our food. But I was a seemingly healthy kid, so it was not too much of an issue. Occasionally some doctor would tell my mother that she needed to fatten me up and so she would feed me extra bananas and make me down milkshakes packed with ice cream for awhile. Not such a bad deal! I loved bananas, but the shakes were a little harder to handle – I always preferred food lower in fat – I would pick ice milk over ice cream any day, preferred non-fat milk to regular and wanted all visible fat removed from meat (on second thought maybe there was something wrong with me!). But I ate like a race horse so at the end of the day everyone left me alone and just chalked my boniness up to genetics. I never minded being called skinny; it was just a part of who I was – “The Skinny Girl”. I was a skinny teenager and a skinny young woman, even after birthing two children. As time went by the girls and women we admired became skinnier and I went from being considered skinny to “normal”. And then I got diagnosed as gluten intolerant and probably for the first time in my life was actually digesting the food I consumed in such great quantities. Combined with hormonal and metabolism changes I gained more weight than I was comfortable with. I was in my thirties and had never dieted in my life; I had no clue what to do so I just cut down what I ate to next to nothing and lost the weight. At the time I thought I was so clever but in truth, nothing was further from the truth. Not eating is not the way to properly loose weight if you want to keep it off. And so the craziness began. After a few years of trying to recapture what I thought of as my identity – The Skinny Girl – I smartened up. I am now happy to be The Healthy Gluten Free Girl. Eighty percent or so of my diet is really good – tons of organic vegetables, lean protein, whole grains, fresh fruit, some seeds and nuts. I do eat desserts, I put cream in my coffee (organic cream, organic coffee) and I will even have a little bit of (GASP!) sugar now and again. But I believe nothing thrives in deprivation, so I never deprive myself. I look at my body like a bank account and I try not to write checks I can’t cover. I keep my body fueled so it will keep going for me. If I indulge a little more than I should then I eat salad for the next meal or I will exercise a bit more. It is all about checks and balances. I will admit this bank account point of view is a new concept for me. Previously I had been known to occasionally get real busy and forget to eat until late at night and then eat everything in sight and collapse into bed. (Seriously? I am a food blogger – how do I forget to eat?) In essence I was overdrawing my “bank account” and being assessed overdraft fees in the form of extra pounds around the middle. Nowadays I try to keep my blood sugar even and so I eat often through out the day. I am still busy so I rely on some conveniences. I carry SOYJOY bars in my purse, have some stashed in my glove box and desk drawer and in my gym bag. Before I was approached by SOYJOY to try their bars I stayed away from nutrition bars either because they contained gluten, tasted nasty or were made with soy isolate. SOYJOY bars are made from real, whole soy (not soy isolate) and real, whole fruit. One of my favorite flavors is banana – ironic huh? My mom used to feed me bananas to try and fatten me up and now I eat banana SOYJOY bars to keep from getting fat! I am grateful to SOYJOY for their commitment to making gluten free nutrition bars which are free from soy isolate, providing me a way to keep my body bank account balanced and be a healthy gluten free girl. Want to know more about your favorite Gluten Free Recipe or how to avoid being bothered by Celiac with our range of Gluten Free Recipes which are made from Gluten Free raw material feel free to visit us at: http://www.simplygluten-free.com Article Source : http://simplygluten-free.com/blog/2011/08/confessions-of-a-skinny-gluten-free-girl.html
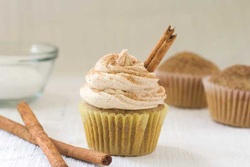 I was having a conversation with my g-kid Julian about his following a glutenfree, dairy-free diet and he said to me “I just don’t want to have to worry about what I eat!” Of course he doesn’t, he’s 10! I know lots of grown ups who don’t want to worry about what they eat either. I believe the best way to get kids to embrace their diet, regardless of the intolerance, is to make them a part of the process of creating their food; everything from thinking up menus to shopping to cooking. The best part is enjoying the fruits of their labor. The other day the g-kids and I planned a whole menu for my son’s birthday, everything was gluten and dairy free and it was abundant; we had London Broil, grilled tilapia, dairy-free mashed potatoes, gluten-free pasta salad, a mixed salad filled with all sorts of fresh veggies and of course a gluten-free birthday cake. The kids came up with the menu, prepared the marinade for the beef, peeled the potatoes, picked basil from the garden and tasted, laughed and enjoyed themselves. They even set and decorated the table. It was a great day and an even better dinner. A couple days later we actually worked on developing our own recipe together. We decided to make cupcakes and Miss Milla wanted to make a cupcake that tasted like ONE of her favorite cookies (emphasis on ONE because, as per her, it is simply not fair to the other cookies to pick just one favorite) the Snickerdoodle. What a joy to bring the kids into the whole creative process of developing a recipe, they gave their opinions, stirred and wrote down notes and we had a marvelous time, especially when it came to taste-testing. We kept it easy and started with a packet of Kinnikinnick White Cake Mix which is not just gluten-free but dairy free also. We added cinnamon and vanilla and then topped the cupcakes with cinnamon sugar to replicate the coating from the original inspiration – the Snickerdoodle Cookie. Then we came up with a dairy free “butter” cream frosting and topped it all off with just a tad more cinnamon sugar. The verdict? See for yourself. Gluten Free Dairy Free Snickerdoodle Cupcakes Ingredients Topping: 6 teaspoons sugar 1 teaspoon cinnamon Cupcakes: 4 large eggs ¾ cup grapeseed (or other neutral tasting) oil ¾ cup cold water 1 teaspoon pure vanilla extract 1 Kinnikinnick White Cake Mix 1 teaspoon ground cinnamon Frosting: ½ cup Earth Balance (or other dairy free butter substitute) 4 cups powdered sugar 1 teaspoon ground cinnamon 1 pinch kosher or fine sea salt 2 teaspoon pure vanilla extract 2 – 6 tablespoons rice milk (or other dairy free milk) Garnish – Optional 6 cinnamon sticks, each one broken into thirds. Directions Preheat oven to 350 degrees. Line 18 standard muffin tins with paper liners. Combine topping ingredients in a small bowl. Combine eggs, oil, water and vanilla in a mixing bowl and whisk (either by hand or with a handheld mixer) for 2 minutes. Gradually add the cake mix and cinnamon, whisk just until combined. Wisk just until combined, mixture will be a little lumpy. Divide batter among prepared muffin tins. Sprinkle about ¼ teaspoon of the topping on each cupcake. Bake for 20 minutes or until risen, lightly browned and a tooth pick inserted in the center comes out clean. Let cool. While cupcakes are cooling, make the frosting. In the bowl of an electric mixer, preferably fitted with a paddle attachment, beat the Earth Balance until smooth. Add the powdered sugar. Cinnamon, salt, vanilla and 2 tablespoons rice milk. Start with the mixer or low and combine. Gradually add more rice milk until the mixture becomes a spreadable consistency. Turn mixer up to medium-high and beat for 30 seconds or so until very creamy. Frost the cooled cupcakes. Sprinkle the frosting with the remaining topping. Insert a piece of cinnamon stick into each cupcake cake if desired. Cupcakes and frosting can be made several days ahead. For best results store cupcakes unfrosted in the fridge, covered with plastic wrap. Store frosting separately in a covered container in the fridge. Let frosting come to room temperature before frosting cupcakes. Frost the cupcakes no longer than a few hours before serving. Makes 18 gluten-free, dairy-free cupcakes Ready for dessert? Want to know more about your favorite Gluten Free Recipe or how to avoid being bothered by Celiac with our range of Gluten Free Recipes which are made from Gluten Free raw material feel free to visit us at: http://www.simplygluten-free.com Article Source : http://simplygluten-free.com/blog/2011/07/gluten-free-snickerdoodle-cupcakes-dairy-free.html
|
 RSS Feed